So, many people who want to download multiple files, probably at one point came across JDownloader.
Jdownloader is quite an amazing tool if you can correctly configure it.
Which will be the main focus of this post.
First, you should download JDownloader, its completely free, and theres No viruses.
http://jdownloader.com/ <- pretty simple link too.
Once you have installed JDownloader you need to configure some things;
First click the settings tab in JDownload and click Reconnection;
---
~ If you know your Exact router name and model;
-- Click Select router, choose your router from the list, and Jdownloader will write the script for you.
~ If you Dont know your exact router, or your router isnt in the list;
-- Click Fetch Router IP
Then your router's IP should appear in the Router IP area, (its most commonly 192.168.1.1)
Now click Create Connection Script**
---
-WARNING-: Please be careful with what you do here, you can really screw up your router.
JDownloader will now open an Internet Window connecting to your router.
---
Most commonly at this point a window will appear asking for a password and username.
If nobody in your house / on your network has changed it, try these combonations;
admin
password
admin
admin
Or google your routers default info.
---
Now your next goal is to get your router to reset.
Most routers upon resetting will acquire A new IP address to the Internet Provider.
A new IP to your Internet provider will let you start downloading with Rapidshare / other download sites.
You may have to dig around the menus for awhile, Mine was in , Settings -> Reboot Gateway
However, everything you click is going to be scripted(or recorded) in JDownloader, So you may want to open a new tab or window, and type your router IP that JDownloader found, and look around for the reset command before you script it.
---
your internet connection WILL reset if you do this correctly,
Once JDownloader sees that you have a new IP address, it will ask if you are finished, click yes.
** If you finish and JDownloader doesnt realize it, Cancel the recording and click the RAWMODE checkbox and try again **
---
Once thats finished, you can Click the AutoReconnect button to make it checkmarked, (in the center top of jdownloaders GUI)
Then start downloading, If you reach any download limits, JDownloader will run a script that will reset your IP again.
** im not sure if this is the same for everyone, but my router doesnt Actually reset connections now, so other people in my house Do not lose internet connection while Im downloading. **
---
Happy Downloading. But be careful
If you are out to download a game;
Like Metal Gear Solid 2.
Make sure you google the specs for it first,
because it might not be able to run with onboard graphics
and you might have a laptop with onboard graphics
and waste 24 hours downloading it D:
Wednesday, August 4, 2010
Tuesday, August 3, 2010
Megaten Farming Bot That Completely Works;
A few months ago I started this big project, I was going to create a bot to farm for me on Megaten
It became a huge project, that I spent hours and hours on.
I started over countless times, redid the source countless times.
It was a real pain.
Now this is a true story, The night I FINALLY finished the program, and started to watch it work, I was disconnected, not banned, the server went under for maintaince. So I waited till it was back up, and to my surprise the bot Still worked.
It was not till I Died that it hit me.
You can no longer rebirth in place...
So now I have this lovely working bot, but I have completely no use for it.
to be honest I believe its flawless, it worked 99% and still does, so long as you don't die.
So perhaps higher levels will benefit from this;
(its all written in AUTOIT3)
Main Program
Plasma Color Tools
ResFinder.au3
and just incase your too lazy to find your own colors, heres 13 of my best;
Colors.au3
by the way, I called this
"Project Scarlet Venus"
I used this on a 1200x800 screen,
It SHOULD detect megaten in windowed mode, reguardless of where the window is, however onces the $res values are set, they cant be changed.
If you get the "Resolution Based for screenshots" Then your megaten window either wasent 800x600 or 1024x768 Or its a different size then what mine was when I made this program.
I cant support these files anymore, I wrote the code almost 4 years ago people. Its not that hard to pick up AutoIT if you really want to get to business.
Userbar General Guide. Creation/Customization.
Introduction:
Okay, userbars are a huge part of modern forums now.
almost every decent signature contains some fancy userbar, and there has to be over a million different generic ones available for download.
But nothing beats customizing your own userbars.
Now there are a few different ways to go about this, theres a few nice programs you can use, if you arent in possession of Photoshop.
Userbars . Com
Userbars.Com is an amazing site to say the least, If you dont have photoshop, Its pretty simple to just click the designer link and create quite a decent userbar, including different scanline patterns and multiple logo layers.
Userbars.Com also features a Userbar Animator, So in the event you have multiple userbars, you can create a .gif simply by uploading your userbars.
AmitySource Userbar Generator
This program I have used personally, although it requires that you install, it is quite a useful tool to have, if you create many userbars.
PhotoShop Method:
Many of you have photoshop at home now, so if you do, this guide show you how to create userbars that you can completely customize.
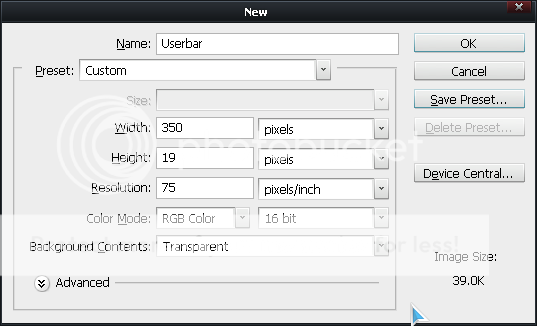
Step 1: Template
Open photoshop, create new, Width -> 350 Height -> 19 Resolution -> 72 (or whatever you want)
You will also want to check for Contents, and make the image "Transparent"
Step 2: Coloring
Next you will color the bar, You can use Solid Color or a Gradient.(most userbars have gradients)
Step 3: Text
Your userbar will now be colored, and need text.
The text used for userbars is called "Visitor"
place this file in "C:/WINDOWS/fonts" to be able to use it in photoshop
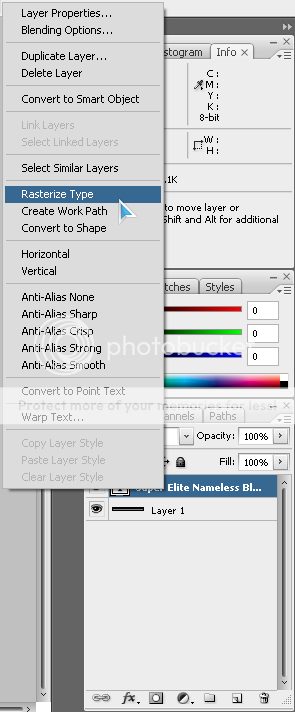
~~ creating outline on the text:
First you will need to Rasterize the text.
(Right click the text layer)


Well this concludes my guide, comment, post your own userbars, help other kids.
Okay, userbars are a huge part of modern forums now.
almost every decent signature contains some fancy userbar, and there has to be over a million different generic ones available for download.
But nothing beats customizing your own userbars.
Now there are a few different ways to go about this, theres a few nice programs you can use, if you arent in possession of Photoshop.
Userbars . Com
Userbars.Com is an amazing site to say the least, If you dont have photoshop, Its pretty simple to just click the designer link and create quite a decent userbar, including different scanline patterns and multiple logo layers.
Userbars.Com also features a Userbar Animator, So in the event you have multiple userbars, you can create a .gif simply by uploading your userbars.
AmitySource Userbar Generator
This program I have used personally, although it requires that you install, it is quite a useful tool to have, if you create many userbars.
PhotoShop Method:
Many of you have photoshop at home now, so if you do, this guide show you how to create userbars that you can completely customize.
Step 1: Template
Open photoshop, create new, Width -> 350 Height -> 19 Resolution -> 72 (or whatever you want)
You will also want to check for Contents, and make the image "Transparent"
Step 2: Coloring
Next you will color the bar, You can use Solid Color or a Gradient.(most userbars have gradients)
 |
Step 3: Text
Your userbar will now be colored, and need text.
The text used for userbars is called "Visitor"
place this file in "C:/WINDOWS/fonts" to be able to use it in photoshop
 |
| Make sure to Turn Off Anti Alising |
~~ creating outline on the text:
First you will need to Rasterize the text.
(Right click the text layer)
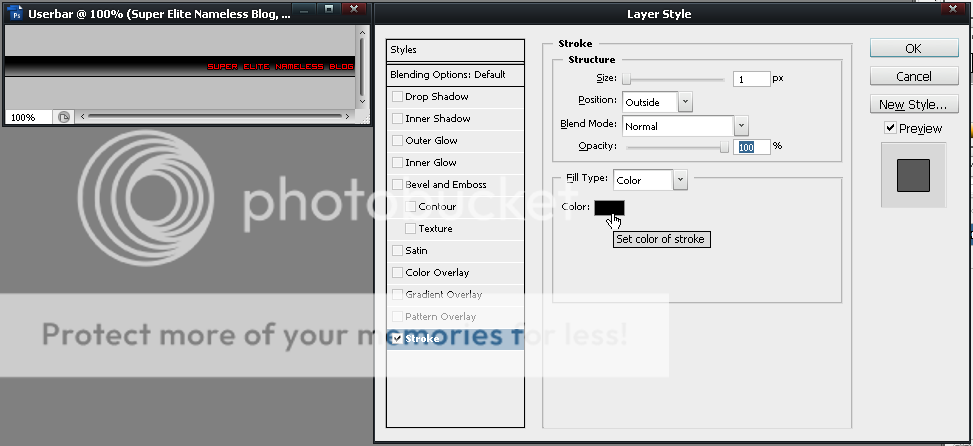
(right click again, this time choose Blending Options)
Now choose Stroke from blending options, from this menu you can customize your text outline.
Make sure to make them 1px !
Step 4: Scanlines
Okay, theres about a million ways you can do this; i'll just teach you the basics, then you can create amazing unique scanlines quite easily.
First, Open a New Document,
make it 6 width and 6 height, and Transparent.
Then, draw a line with your pencil, this is the most generic one;

but you can create literally anything you want, just get creative with your pencil.
After that, press EDIT - ; Define Pattern
Now go back to your userbar image, and select your Layer with the colors on it.
Some people at this step would advise a pattern stamp, which does work, if you lower the opacity accordingly, But if your a newbie just Right click your colored layer,
Then click blending options, and choose Pattern Overlay, then select your scanline pattern. Simple enough
Step 5: The Glowing Part
This is perhaps the most annoying part of any userbar.
If you are a newbie, you might just want to skip this step.
First make a new layer,
Then select your Elliptical Marquee Tool,
Now try to position your mouse so that the ellipse covers your userbar from side to side, as well as even on both side, this is a difficult task sometimes.
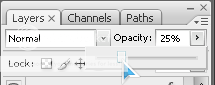
After that, switch to your paint bucket tool, and dump that area White.
Then adjust the Opacity on the layer until it matches what you want.
Your image should look something like this;
Step 6: Images
Im not going to explain images too well here, they are quite simple, if you have Ever used photoshop you know about the Transform tool, as well as blending options to make your userbar look nice, If your really good you can even make the color of your userbar be an image.
Many times people will use .ico from their computer programs as pictures in a userbar, if your new to this, why dont you try that?
Step 7: Final Touches
Every userbar has a Border;
Select all, Select->Modify->Border
Select all, Edit->Stroke
Flatten Image, BlendingOptions->Stroke
Use one. ^-^
---
Well this concludes my guide, comment, post your own userbars, help other kids.
Subscribe to:
Comments (Atom)