Okay, userbars are a huge part of modern forums now.
almost every decent signature contains some fancy userbar, and there has to be over a million different generic ones available for download.
But nothing beats customizing your own userbars.
Now there are a few different ways to go about this, theres a few nice programs you can use, if you arent in possession of Photoshop.
Userbars . Com
Userbars.Com is an amazing site to say the least, If you dont have photoshop, Its pretty simple to just click the designer link and create quite a decent userbar, including different scanline patterns and multiple logo layers.
Userbars.Com also features a Userbar Animator, So in the event you have multiple userbars, you can create a .gif simply by uploading your userbars.
AmitySource Userbar Generator
This program I have used personally, although it requires that you install, it is quite a useful tool to have, if you create many userbars.
PhotoShop Method:
Many of you have photoshop at home now, so if you do, this guide show you how to create userbars that you can completely customize.
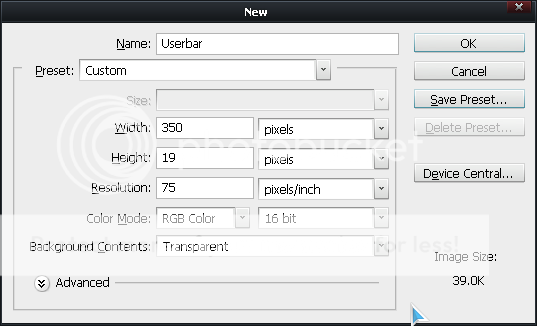
Step 1: Template
Open photoshop, create new, Width -> 350 Height -> 19 Resolution -> 72 (or whatever you want)
You will also want to check for Contents, and make the image "Transparent"
Step 2: Coloring
Next you will color the bar, You can use Solid Color or a Gradient.(most userbars have gradients)
 |
Step 3: Text
Your userbar will now be colored, and need text.
The text used for userbars is called "Visitor"
place this file in "C:/WINDOWS/fonts" to be able to use it in photoshop
 |
| Make sure to Turn Off Anti Alising |
~~ creating outline on the text:
First you will need to Rasterize the text.
(Right click the text layer)
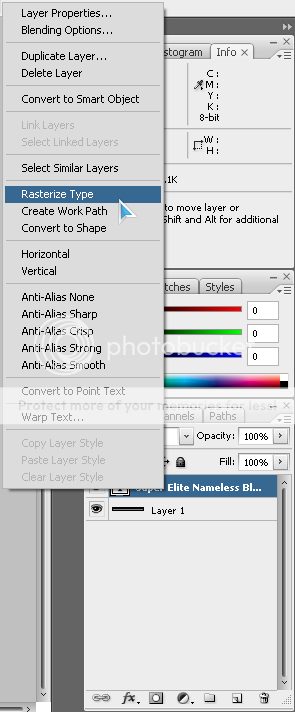
(right click again, this time choose Blending Options)
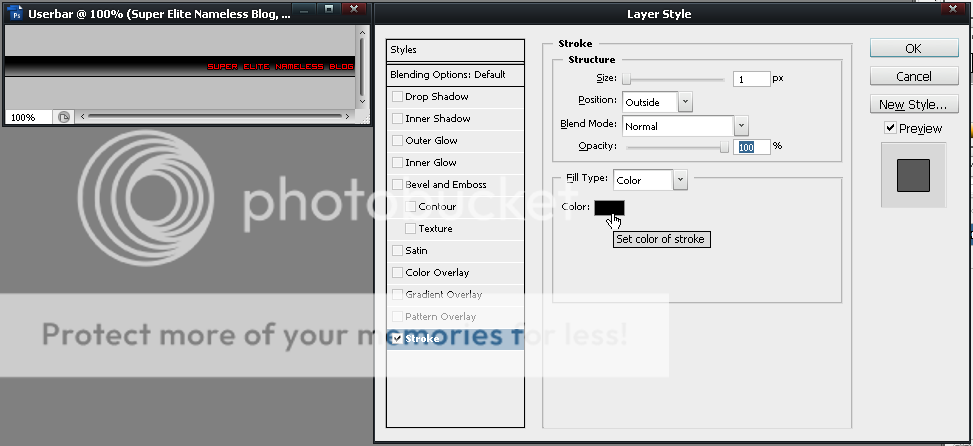
Now choose Stroke from blending options, from this menu you can customize your text outline.
Make sure to make them 1px !
Step 4: Scanlines
Okay, theres about a million ways you can do this; i'll just teach you the basics, then you can create amazing unique scanlines quite easily.
First, Open a New Document,
make it 6 width and 6 height, and Transparent.
Then, draw a line with your pencil, this is the most generic one;

but you can create literally anything you want, just get creative with your pencil.
After that, press EDIT - ; Define Pattern
Now go back to your userbar image, and select your Layer with the colors on it.
Some people at this step would advise a pattern stamp, which does work, if you lower the opacity accordingly, But if your a newbie just Right click your colored layer,
Then click blending options, and choose Pattern Overlay, then select your scanline pattern. Simple enough
Step 5: The Glowing Part
This is perhaps the most annoying part of any userbar.
If you are a newbie, you might just want to skip this step.
First make a new layer,
Then select your Elliptical Marquee Tool,
Now try to position your mouse so that the ellipse covers your userbar from side to side, as well as even on both side, this is a difficult task sometimes.

After that, switch to your paint bucket tool, and dump that area White.
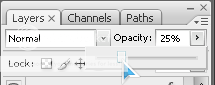
Then adjust the Opacity on the layer until it matches what you want.
Your image should look something like this;
Step 6: Images
Im not going to explain images too well here, they are quite simple, if you have Ever used photoshop you know about the Transform tool, as well as blending options to make your userbar look nice, If your really good you can even make the color of your userbar be an image.
Many times people will use .ico from their computer programs as pictures in a userbar, if your new to this, why dont you try that?
Step 7: Final Touches
Every userbar has a Border;
Select all, Select->Modify->Border
Select all, Edit->Stroke
Flatten Image, BlendingOptions->Stroke
Use one. ^-^
---
Well this concludes my guide, comment, post your own userbars, help other kids.
No comments:
Post a Comment